Power Blade 2 Walkthrought
Kick off your run knowing the first four stages aren’t hard-locked — tackle them in any order. In Power Blade 2 (we called it both “Power Blade 2” and Power Blade II; some carts even flashed “Captain Saver”), the best loot hides behind plain doors and in cul-de-sacs with backtracks. Follow a simple rule: see a vertical shaft — check both up and down; spot a side ledge — backtrack and press the right/left wall for a passage. A spare minute pays for itself with a suit, a heart pickup worth half a bar, or a 1UP.
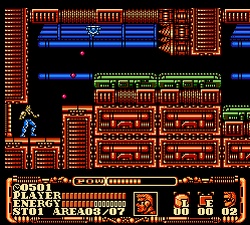
Factory/Lab: grab the heavy suit for frontal brawls
The gauntlet of pipes and presses punishes rushing. Right after you spawn, stick to the top platforms: there’s a short fork with turrets and a door with a blinking light tucked behind it. Inside you’ll meet the contact NPC and a mini-boss. Ideally arrive with two power upgrades (letter P) and a full meter. The mini has two patterns: a diagonal volley and a dash. Jump — two steps back — toss the boomerang — repeat, never letting him jam you into a wall. Win and you’ll score the heavy power suit — higher damage, reduced knockback, clutch on conveyors.
Don’t drop into the first lower tunnel — it’s a blender of presses, edgy music, and stingy loot. Climb the right ladder, clear the room with flip platforms, then dive the shaft. Pause at the bottom: the presses run “two quick — long pause.” Cross on that long beat and you’re rewarded with a heart capsule and a short walk to the boss.
The factory boss loves to spray a fan and hop. Play from mid-range: hop back — two clean boomerangs — duck the spread — hop back again. In the heavy suit you can afford a hit or two, but don’t get greedy — the damage window is brief and the follow-up volley comes faster.
Airbase/Shipyard: route to the rocket suit
Main trap here is fans and wind tunnels. The first section is easier down low: crouch under the turret, on the second platform wait out two gusts and sprint through in one go. Keep your pace — linger and the draft shoves you back. Look for a side door right after the vertical hall with three turrets — it’s hidden past a short ladder up. Inside, another mini-boss: tight room, low ceiling, and his tells are pure telegraph. Two flashes — straight shot; three — spread. Clip the first two patterns with jump shots and crouch on the third — your boomerangs sail overhead. The rocket suit makes half the stage trivial: quick hops over chasms, feather-soft landings on tiny platforms, nerves preserved.
There’s a juicy detour for a 1UP: climb to the very top of the vertical fan shaft, take a running boost in the rocket suit, and snag the ceiling lip to the right — a skinny room hides an extra life and a big heart. Without the suit it’s basically a no-go; the wind won’t let you in.
The airbase boss hugs the screen edge and cycles “hop — spread — dash.” Rule one: don’t idle mid-screen. Hug the right wall, snipe him on the turn, and throw diagonally up. Rocket suit gives a comfy plan: short boost to his back — two hits — fall back half a body before the dash fires.
Jungle/Cliffs: time for the climbing suit
The first half is bridges, vines, and stone ledges. At the second waterfall, don’t dive into pointlessness — a door hides to the right behind a thin ledge. To reach it, take a running jump and grab the very tip, then a quick shimmy right and one more hop. Inside is a mini-boss that wall-jumps and dashes — tailor-made to sell the next suit. Hold center, swing only on his landings, and don’t chase — he curves mid-air. The reward turns you “sticky”: you can cling to walls and ceilings, hang on verticals, and crawl over spikes.
Head back to the waterfall and take the high route. Two gems wait there: a big heart container in a ceiling pocket (snagged via ceiling hang) and a bypass over spikes that saves a chunk of time. Before the boss is a corridor with “falling” ceiling blocks. Don’t rush — bait them: step in, step out, block drops, move past. Often there’s a range capsule (letter R) under a block — grab it, the boss will feel it.
The jumping boss here loves vertical hops and slam landings that fling sparks along the floor. The cure is a simple loop: stand half a body from his sprite, jump — step back — throw — another small step as the sparks fan out; after the landing he’s hollow for a beat — dump a powered boomerang there.
City/Security HQ: unlock the “patriot” suit
Lifts, barriers, and security lasers everywhere. Start on the lower route: a corridor with two turrets and a sandwich wall that hides the contact’s door. The laser pulses on a fixed beat — roll the timing “three blinks — pause” and dash through. The mini-boss shoots tight but slow; his flaw is the long downtime between salvos. Stay grounded — take off and you’ll eat crossfire. Your prize is a suit that turns the boomerang into a beefy fan shot and gives a small frontal screen — perfect for corridors.
On the way to the boss, don’t skip the side room with a lift “to nowhere”: step in, let the lift leave, and a shaft opens beneath it with a secret 1UP corridor. Return via the upper door — a neat shortcut to the arena.
The guard boss rides a platform and shifts height. Don’t waste time hopscotching lifts: meet him at the edge where he takes a mandatory step before his volley. Two clean tags — back off — repeat. The “patriot” suit lands easy headshots from safety — its arc clips him and saves attempts.
Final Complex: a full suit check
The path is linear now, but every room remixes the nastiest tricks from earlier. Golden rule: each big hall has a “right” approach for a specific suit. Sparse vertical shaft — that’s for wall-crawling. Pit with moving beams — rocket boost. Press corridors — heavy suit so knockback won’t punt you into spikes. Long straight with guards in a row — time to fan them with the patriot shot.
The first half splits into three wings. Left wing tests flight: two long gaps and turrets at staggered heights. Fly in short taps, manage your “fuel” — release the button as soon as you gain height, don’t hold it. Center wing is ladders and lasers. Climb to the cadence “laser off — two rungs — stop.” Right wing has presses and a mini-arena with chunky bots. Heavy suit lets you march through: step — hit — pause — step.
Before the penultimate boss, grab the big heart in a ceiling niche: hang from the top in the sticky suit and “hand-over-hand” from ledge to ledge. In the arena he alternates quick dashes and projectile spreads. The fan shot is the best answer — it blankets both lanes so you don’t have to guess your jump.
The final stretch is a long elevator climb with guards on the flanks. Hybrid loadout shines: start heavy to tank pressure, switch to rocket mid-way to slip past interceptors, then go patriot in the upper hall to sweep the perch. Pro tip: on the second platform to the left there’s a tiny alcove with a heart — don’t zoom past it; that pickup often decides the run.
The last boss parks in the center and cycles three patterns: spread, straight beam, and a ground-slam jump. The game plan: open in the heavy suit, take the first trade and pound the chassis; when the spreads start, swap to rocket — careful boost to the safe pocket above his shoulder — two hits — bounce out; on the third loop, switch to patriot, arcing shots along his diagonal as he charges the beam. Close it out clean — don’t fish for a bonus hit after the slam — the floor crackles and you’ll eat damage for free.
That’s Power Blade 2 picked clean. If you want to refresh the fundamentals, hit /history/ for context and /gameplay/ for core tech — then swing back to hunt those corner capsules you skipped on your first pass. And yep, stages will clap back if you walk in wearing the “wrong” suit — sometimes the scenic detour beats the main line.